If you’re looking to tantalize your taste buds with a unique and flavorful jelly, beauty berry jelly is the perfect choice. This delightful preserve captures the essence of beauty berries in a jar, providing a burst of sweet and tangy goodness. In this comprehensive guide, we will take you through the step-by-step process of crafting your own homemade beauty berry jelly recipe, from foraging the berries to preserving the final product.
Foraging for Beauty Berry Jelly Recipe
Before you can embark on the delightful journey of crafting homemade beauty berry jelly, you need to start at the very beginning – foraging for the star ingredient, beauty berries. In this section, we’ll guide you through the process of finding and harvesting these vibrant gems of nature, setting the stage for your jelly-making adventure.
Meet the Beauty Berry Bush
Beauty Berry Jelly Recipe, scientifically known as Callicarpa americana, are native to the southeastern United States. These shrubs are characterized by their striking magenta-colored berries, which grow in clusters along the branches. Beauty berry bushes are often found in wooded areas, along forest edges, or in your own backyard if you’re fortunate enough to have them.
Identifying Ripe Beauty Berries
Picking ripe beauty berries is essential for the success of your jelly-making endeavor. Here’s how to identify when they are ready for harvest:
- Color: Ripe beauty berries are a vibrant, jewel-like purple. They should be uniformly colored with no traces of green.
- Firmness: Gently touch the berries. They should feel plump and firm to the touch. Avoid berries that are mushy or overly soft.
- Easy Separation: Ripe beauty berries are easy to pluck from the stem with a gentle tug. If they don’t come off easily, they may not be ripe yet.
Tools for Foraging
Foraging for Beauty Berry Jelly Recipe requires minimal equipment, but there are a few handy tools that can make the process more efficient:
- Gloves: Wearing gloves can protect your hands from scratches and thorns, especially if you’re foraging in a wilder area.
- Basket or Container: Use a basket or container to collect the berries. Baskets with breathable sides are ideal as they allow air circulation and prevent the berries from getting crushed.
- Pruning Shears: In some cases, you may need pruning shears to reach clusters of berries high up on the branches.
Harvesting Beauty Berries
Once you’ve identified ripe beauty berries and gathered your foraging tools, it’s time to start harvesting. Here’s a step-by-step guide:
- Inspect and Pluck: Carefully examine the clusters of beauty berries on the bush. Ensure they meet the criteria of being uniformly purple, firm, and easy to separate from the stem.
- Gently Pluck: With gloved hands, gently pluck the ripe berries from the branches. It’s important not to rush this process to avoid damaging the delicate fruits.
- Collect in Your Container: Place the freshly harvested beauty berries into your basket or container. Be mindful not to overcrowd them to prevent squishing.
- Leave No Trace: While foraging, remember to leave no trace. Don’t damage the beauty berry bushes or the surrounding vegetation, and respect the natural habitat.
Timing Matters
To embark on your Beauty berry Jelly Recipe making journey, you need to know when to forage for these vibrant gems. Beauty berries typically ripen in late summer to early fall, with their color shifting from green to a rich, deep purple. Ensure you pick them when they are fully ripe for the best flavor.
Choosing the Right Berries
When foraging for beauty berries, look for plump, firm, and fully purple berries. Avoid those that are underripe or overripe, as they may not provide the ideal flavor and consistency for your jelly.
Ingredients You’ll Need to Prepare Beauty Berry Jelly Recipe
Before preparing the Beauty Berry Jelly Recipe making process, gather your ingredients. Here’s what you’ll need:
- 4 cups of fresh beauty berries (washed and stemmed)
- 1/4 cup of lemon juice (freshly squeezed)
- 1 package (1.75 oz) fruit pectin (such as Sure-Jell)
- 4 1/2 cups of granulated sugar
Preparing the Beauty Berry Juice
Step 1: Crushing the Berries
Place your washed and stemmed beauty berries in a large saucepan. Use a potato masher or a fork to gently crush the berries, releasing their juices. This step is crucial for extracting the berry essence.
Step 2: Cooking the Berries
Heat the crushed berries over medium-high heat, stirring constantly to prevent sticking. Bring the mixture to a boil and let it simmer for about 10 minutes. The heat will further break down the berries and release their flavors.
Step 3: Straining the Juice
Once the berry mixture has simmered and cooled slightly, strain it through a fine-mesh strainer or cheesecloth into a clean bowl. Press down on the solids to extract as much juice as possible. Discard the leftover solids.
Making the Beauty Berry Jelly Recipe
Step 4: Preparing the Jars
While the beauty berry juice is straining, wash your canning jars, lids, and bands in hot, soapy water. Rinse them thoroughly and let them air dry.
Step 5: Mixing the Pectin
In a separate bowl, mix the fruit pectin with 1/4 cup of sugar. This prevents the pectin from clumping when added to the hot berry juice later.
Step 6: Cooking the Jelly
Pour the strained beauty berry juice back into the saucepan and add the pectin-sugar mixture. Stir the mixture well. Place the saucepan over high heat and bring it to a rolling boil, stirring constantly. Once it’s boiling, add the remaining sugar all at once, and continue to stir vigorously.
Step 7: Achieving the Gel Point
Boil the mixture for about 1-2 minutes until it reaches the gel point. To test the gel point, you can use the wrinkle test. Place a small amount of the jelly on a chilled plate, let it sit for a moment, and then push it with your finger. If it wrinkles and holds its shape, it’s ready.
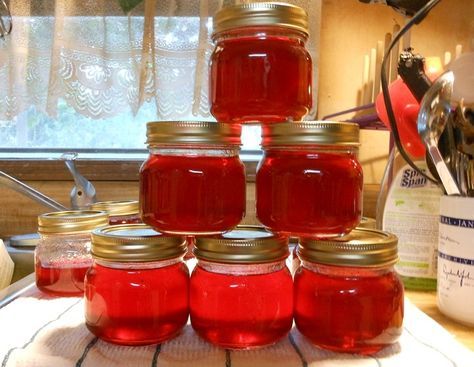
Step 8: Filling the Jars
Carefully ladle the hot beauty berry jelly into your prepared canning jars, leaving about 1/4-inch of headspace. Wipe the jar rims clean with a damp cloth to ensure a proper seal.
Step 9: Sealing the Jars
Place the lids on the jars and screw on the bands until they are fingertip-tight. This ensures that air can escape during the canning process.
Step 10: Processing the Jars
Process the filled jars in a boiling water bath for about 10-15 minutes to ensure they are properly sealed and preserved. Make sure the water covers the jars by at least 1 inch.
Step 11: Cooling and Storage
After processing, remove the jars from the water bath and let them cool on a clean towel or cooling rack. As they cool, you may hear the satisfying “pop” of the lids sealing. Once completely cool, check the lids for a proper seal by pressing the center of each; if it doesn’t pop back, the jar is sealed.
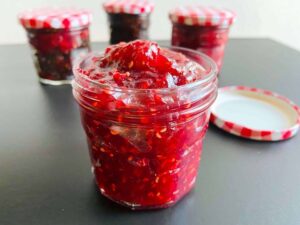
Enjoying Your Homemade Beauty Berry Jelly
Your homemade beauty berry jelly is now ready to grace your breakfast table or enhance your favorite recipes. Spread it on toast, mix it into yogurt, or use it as a glaze for meats and poultry—the possibilities are endless. Enjoy the sweet taste of your labor and the satisfaction of creating a delectable treat from nature’s bounty.
Conclusion
crafting beauty berry jelly Recipe at home allows you to savor the unique flavors of these vibrant berries year-round. With a little effort and a lot of love, you can create a delicious and versatile preserve that will deli aght your taste buds and those of your lucky guests. So, gather your beauty berries, follow these steps, and embark on a flavorful journey into the world of homemade beauty berry jelly.


